Declarative Actions (DA’s for short) have been around for quite a while now. Although trusty UI Actions are still going strong, and apply across all interfaces – including Next Experience-based ones, Declarative Actions are much more flexible, powerful, and can be used in many additional locations in Next Experience-based interfaces.
I’ve often found DA’s a little confusing. Part of this comes from that flexibility and power, but part also probably comes from the fact that they were originally created circa the Orlando release and originally designed for use with the legacy Agent Workspace. Since then though they have grown to primarily support and work with new Next Experience-based interfaces.
This article focuses exclusively on Declarative Actions as they work with new Next Experience-based interfaces; think anything created or editable in UI Builder – like CSM Configurable Workspace, or Service Operations Workspace.
There are a few tables and other aspects of DA’s that apply only to the legacy Agent Workspace. I have intentionally omitted these for simplicity as it is unlikely going forward you’ll need to do much with these.
With more-and-more Next Experience-based UI’s being released, I decided recently to deep-dive into DA’s to fully understand how they work, and to be able to share my learnings. Although there are a lot of guides out there, there was nothing totally comprehensive which entirely completed the puzzle for me. I hope this article will complete the puzzle for you.
Declarative Action Basics
What are Declarative Actions?
Think of Declarative Actions as an upgrade to UI Actions.
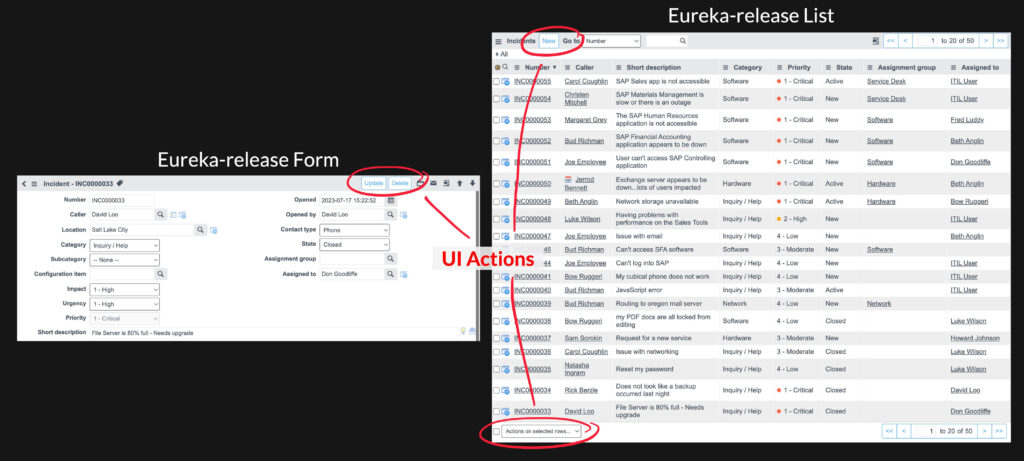
UI Actions have been around forever in ServiceNow and let users perform actions from lists and forms. Furthermore, they allow developers and admins to define new actions so they can tailor the way that out-of-box lists and forms work without editing their UI code.
Historically, ServiceNow was all about lists and forms in the Core UI. That meant users mainly interacted with lists of records – like a list of incidents. When the user clicked on a record in a list they were taken to a detailed form view of that record. UI Actions were designed for UI’s based around this paradigm. There was also the occasional “workbench” interface, however those were entirely bespoke and rigid and didn’t offer a standard way to add elements to the interface.
Admins could add UI Actions to the top or bottom of a form, and adjust how they’re presented to users – for example, as a link, or within a menu. They could also do the same at the top or bottom of a list, and have users take action on many records at a time.
But things are changing. There are many new Next Experience-based UIs like Workspaces, Playbooks, and Catalog Wizards. Plus, users can build their own custom Next Experience-based UIs. UI Actions don’t work well with these new types of UIs because they’re so heavily based around the concept of lists and forms.
That’s where Declarative Actions come in. They’re more flexible and work with any style of UI, whether it be a list, or a form, or a playbook, or a catalog wizard. They are the future of performing actions in ServiceNow.
It’s important to stress though that UI Actions still have their place. While you can do everything that UI Actions do with Declarative Actions in Next Experience-based UI’s, Declarative Actions don’t work in the Core UI.
This means for example if you want to create an “Assign to Me” button on the Incident incident table, if you did that with Declarative Actions that button would only appear when viewed through a Next Experience-based UI – it wouldn’t appear in the Core UI.
This might be fine – your users might solely be using the Next Experience-based UI, and will never use the Core UI. However if you want parity of functionality between the two interfaces, it’s still worth leveraging UI Actions, and they can work in harmony on lists and forms. Some Next Experience components like the Action Bar have functionality to display UI Actions alongside Declarative Actions.
What Types Are There?
While UI Actions only support lists and forms, DA’s are designed with much more flexibility and thus can support many places in the interface that one may want to add actions to.
As of writing the following DA types exist, which display in the areas of the interface as noted.
| Area of Interface | DA Types |
|---|---|
| Lists | List Related List |
| Forms | Form Field Attachment |
| Service Catalog | Catalog Wizard |
| Playbook | Playbook Playbook Stage Playbook Card |
| Kanban Boards | Board |
| EVAM | EVAM |
When developers at ServiceNow are building out-of-box components they can enable them to support DA’s. This means that as new components and interfaces are developed and released there is the possibility that even more types will become available.
In most cases there’s a 1-to-1 relationship between a component which supports DA’s, and a DA type. For example, List-type DA’s always appear in the List component. However there are other cases where a single component supports multiple different types of DA. For example the Playbook component can have Playbook, Playbook Stage and Playbook Card-type DA’s appear in it.
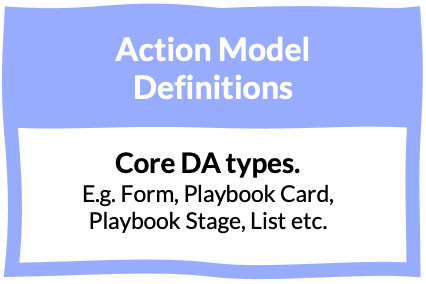
Each of these different types of a DA can be found in the Action Model Definitions sys_declarative_action_model_definition table.
What Can They Do?
Executing a DA is usually done by clicking on it – for example, clicking on a button. What path the execution of a DA follows when it is executed is referred to as how it is “implemented”.
There are three different ways a DA can be implemented in Next Experience-based interfaces:
- Client Script – to execute a UI Action-style script on the client-side.
- Server Script – to execute a UI Action-style script on the server-side.
- UXF Client Action – to dispatch an action in a Next Experience-based UI for handling by an event handler in UI Builder.
There are other ways a DA can be implemented, however they are only relevant to the legacy Agent Workspace interface and so I’ve intentionally omitted them from this article
An example scenario of a DA implemented as a Client Script might be where you want some kind of browser action to be performed – like each of the items selected in a list to be opened in a new browser tab, a web request to be made to determine a value for a field, or some kind of interaction with the GlideForm or GlideList API’s.
An example scenario for a DA implemented as a Server Script on the other hand might be where you want to add an “Approve” button at the top of a form to update a related approval record. Because it’s a related record you’re updating, the GlideForm API won’t really be useful (as it only knows about the current record). This action requires some additional queries of the approval table, and that is usually best done on the server-side.
The Server Script and Client Script implementation types should be very familiar and easy to understand coming from the world of UI Actions. Similar to UI Actions, deciding whether to choose to implement your DA as a Server Script or a Client Script is really up to you and the considerations of your use case.
DA’s implemented as a UXF Client Action however are very different to the world of UI Actions. What can be done with these is very much down to the page that they are appearing on as they simply dispatch actions with a payload, and those actions need to be handled by the UI Builder page itself.
For example, a record page might have an event handler on it to support opening a record’s form in a sub-tab, or in a modal dialog. An extreme example might be a podcast player page that has an event listener to allow a specified audio file to be started playing from a certain point. It’s really up to what the page and it’s event handlers allow to be done – and don’t worry, I’ll be covering event handlers later in this article.
It’s worth noting that although the execution of a Client Script and UXF Client Action starts on the client-side, that doesn’t mean they can’t trigger something to happen on the server-side as well. This could be done in a Client Script through a GlideAJAX request, or in a UXF Client Action through the event hander triggering the execution or refresh of a data resource.
Who Creates Them?
There are three different personas that have a role in the creation of Declarative Actions and determining what they have the capacity to do.
Component Author
Developers at ServiceNow create the components that DA’s can be presented inside. They also determine what type of DA’s will show up in their components (creating new Action Model Definitions if necessary), and what contextual data can be passed along from the component to the DA. Let’s call this persona the Component Author.
Page Author
Whether they be the developers of ServiceNow, or partners, or customers, the Page Author persona creates pages in UI Builder that leverage DA-enabled components. For example, a Page Author might create a record page that has the Action Bar component on it, which hosts Form-type DA’s.
The Page Author will also build into their pages capabilities that they want to allow be triggered by DA’s implemented as UXF Client Actions. For example, they can ensure an event handler is setup on their page so that DA’s can trigger a modal to open, or for a specific tab in the sidebar to be selected, or a specified audio file to start playing.
For those capabilities they build into the page they also know exactly what data is required by them. In the case of the modal, perhaps they built some kind of behaviour to automatically close the modal after a set number of seconds and they want to allow DA’s to specify that timeout value. The Page Author can create payload records to do this, which will help Declarative Action Authors by giving them a template to start from when defining the data that will be provided by their Declarative Action – and don’t worry, I’ll be covering payloads later in this article.
Declarative Action Author
As with UI Actions, the whole point of Declarative Actions is to allow additional functionality to be added by developers and admins without requiring they edit the code of the UI itself. This means developers and admins shouldn’t need to make changes to a page to be able to add actions to it. Making changes to a page not only requires edit access (which even admins may not have the rights to) but also makes upgrades harder, and so this architecture principle of Declarative Actions is a good one.
When developers and admins are defining DA’s and placing them on specific parts of the UI, they are taking on the role of the Declarative Action Author.
The Page Author and the Declarative Action Author may in some cases actually be the same person. For example, what’s the point of a Page Author creating a record page with no actions able to be performed on it out-of-box? They will likely of course want to create some DA’s that come out-of-box with their page (such as a “Save” button). In this case they will be performing the role of both the Page Author and the Declarative Action Author.
However, later on another developer or admin can come along and take on just the role of Declarative Action Author by adding their own Declarative Actions to that page – without requiring the page to be edited and therefore not requiring taking on the role of a Page Author as well.
For DA’s implemented as a UXF Client Script, what the Declarative Action Author can do is limited by what the Page Author has already done on the page. For example, the Declarative Action Author cannot create a DA which performs an action if the Page Author hasn’t created a page which allows for that action to happen.
Giving Declarative Actions Context
A Declarative Action being provided with context is critical to ensure that it can perform useful operations. For example, in the earlier scenario of an “Open in new tab” button at the top of a list, what use would it be if it didn’t know which of the items in the list were selected?
In the case of a DA implemented as a Server Script or Client Script, this context is provided to those scripts in the same ways that UI Actions are – via the current object (and in some situations the parent object) in the case of a Server Script, or the GlideForm and GlideList API’s in the case of a Client Script.
However on the client-side, DA’s have a lot of additional functionality when it comes to context. This makes sense because the GlideList and GlideForm API’s are predictably very list and form based API’s, and additional context is needed with the expanded types such as Playbook Card or EVAM that DA’s offer.
Each DA type has different contextual data that can be provided to it on the client-side. It makes sense that a List-type DA would be provided with context about what records in the list are selected, but it doesn’t make sense that a Form-type DA would be given that same context.
Some other examples of useful context:
- A Field-type DA appears as a button next to a field. The name of the field, its current value, and the table and sys ID of the record that the user is viewing that field on would all be useful contextual data to have.
- A Playbook Card-type DA can appear as a button at the bottom of a card that represents an activity in a process. The name of the activity, the associated record’s table and sys ID, and the status of the activity would all be useful contextual data to have.
Definitions of this contextual data are stored in the Action Model Fields sys_declarative_action_model_field table, which is directly related to the previously mentioned Action Model Definitions table that stores the core DA types.
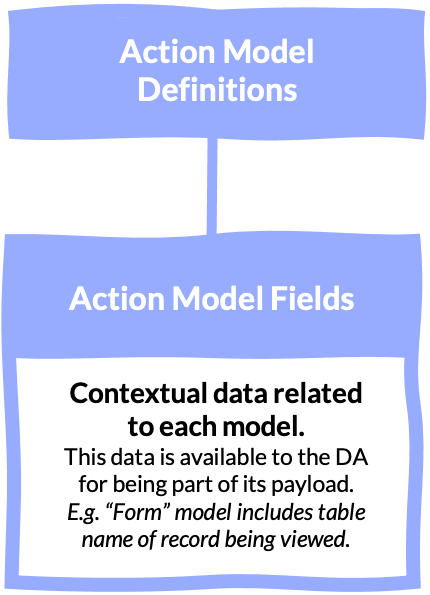
The Action Model Fields table is also shown as a related list on the Action Model Definition form, allowing you to see exactly what contextual data is available to each DA type.
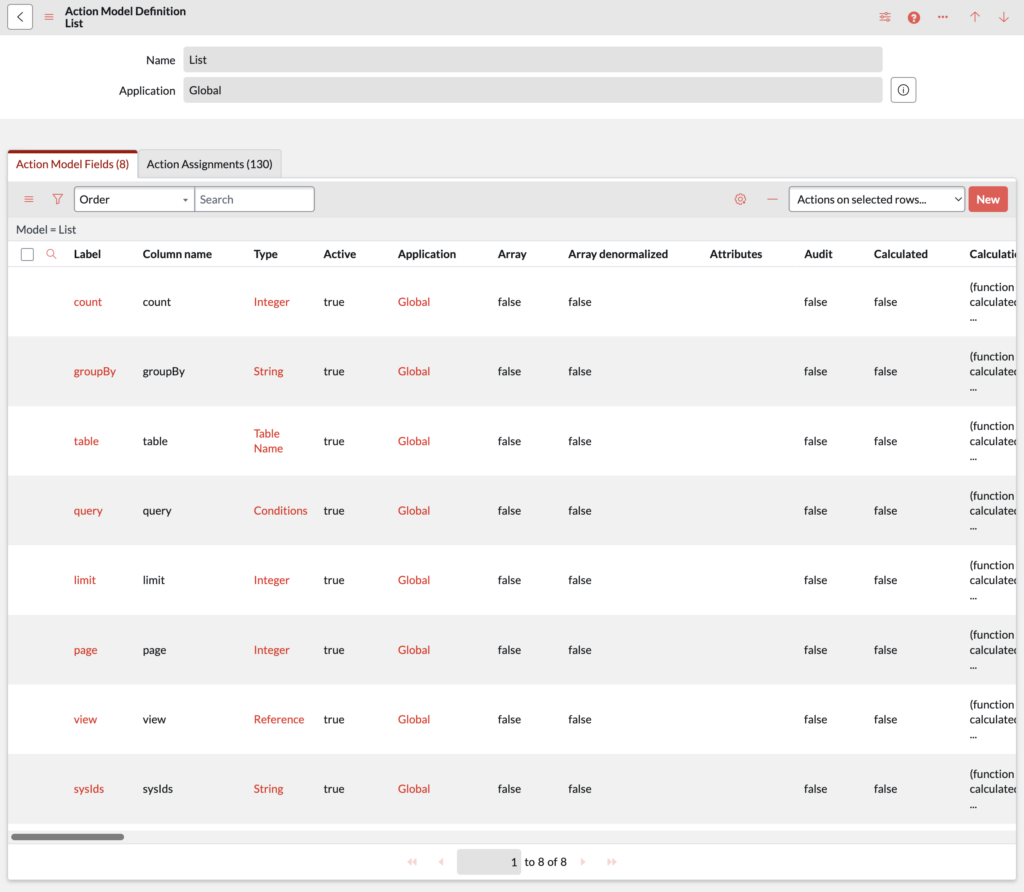
It’s important to understand that this additional contextual data is not available to the “script” fields of DA’s implemented as a Client Script or Server Script. These both operate in the same way as UI Actions, with context supplied through current (and in some situations parent) on the server-side, and GlideList and GlideForm API’s on the client-side.
However the additional contextual data is available to the Client Conditions and Scripted Client Conditions fields of all DA’s regardless of how they are implemented, so it certainly can have some use for all implementation types. It’s primarily useful for DA’s implemented as a UXF Client Action though as you will see later on in this article.
Pre-Prepared Payloads
As mentioned earlier, a task that the Page Author needs to do when creating a page in UI Builder is to hook up event handlers to determine what capabilities the page has that Declarative Action Authors can leverage for their DA’s which are implemented as a UXF Client Action. I’ll cover later in this article how this is done, however what these actions are is of course not static across all pages but is instead determined by the page itself and what its purpose is.
Some examples might be that a record page requires the ability to open another record in a sub-tab, or open a modal, and for an extreme example a podcast player page would need the ability to start an audio file playing.
Each of these different actions that can be performed on the page requires different data to be sent to it. Navigating to another record would require the table name and the sys ID of the record to navigate to. For an action that plays an audio file, you’d probably need to supply the URL of the audio file, and perhaps a timecode for where in the audio file to start playing from.
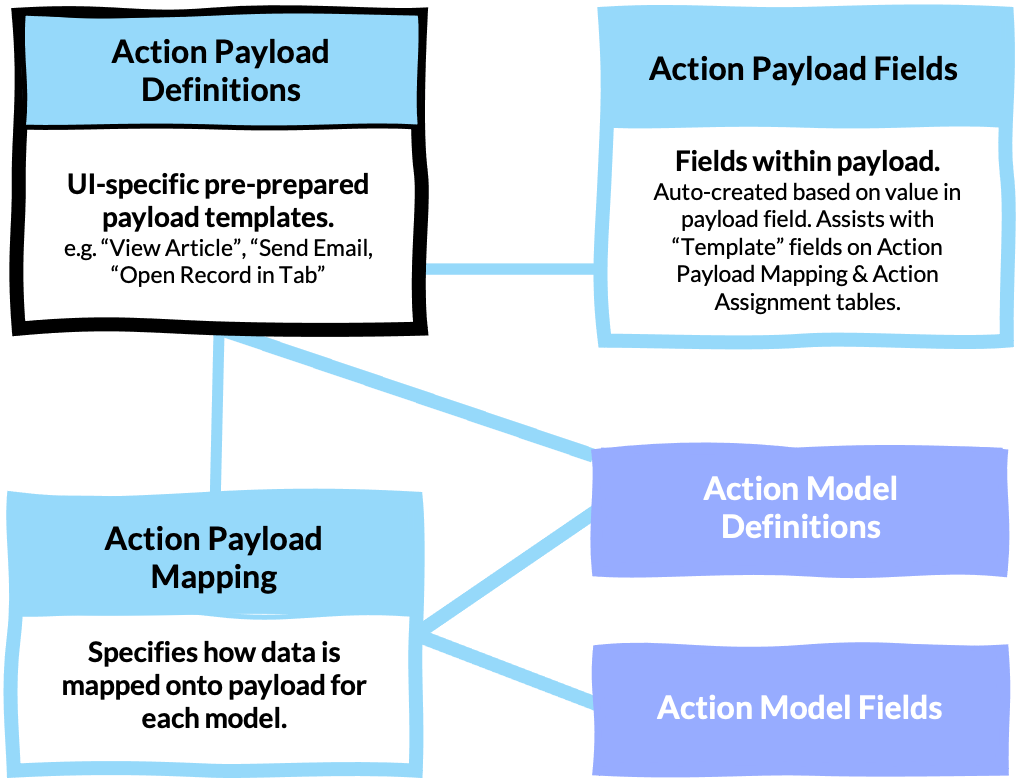
Because these actions on a page are defined and controlled by the Page Author, that persona is also best placed to create Action Payload Definitions sys_declarative_action_payload_definition. These are essentially pre-prepared templates of the data that’s expected to be sent to the event handler on the UI Builder page. It’s in this table that you define the models that the payload supports, as well as a template of the payload in JSON object format.
For example, in the scenario where a Page Author is creating a podcast player page, the action which plays the audio file might have in the payload field of its Action Payload Definition the following:
{
    "audioFileUrl": "",
    "startAtTime": "00:00:00",
    "episodeId": "{{sysId}}"
}
The purpose of each of the properties here should be self-explanatory based on their name, however their values are worth noting.
- The
audioFileUrlproperty has an empty value, meaning that unless the Declarative Action Author overrides it when they use this payload, this property on the payload will be an empty string. - The
startAtTimehas a value of00:00:00. This will be the default value, but again the Declarative Action Author can override it if they want to. - The
episodeIdproperty has a value of{{sysId}}. Being in double-curly braces makes this a placeholder for contextual data from the DA type. For example, a Form-type DA has an Action Model Field with the namesysId, so if this payload were used in a DA in the Action Bar this placeholder would be replaced by the sys ID of the record being viewed. Again, this will just be the default value and it can be overridden by the Declarative Action Author if they want.
You will notice various Action Model Field records of type “Data Object” and “JSON”. An example of these is variables on the Catalog Wizard type, and currentUser on the Form type. These you are able to dot-walk with, so for example if you had a variable called ordered_by appearing in the catalog wizard, you could access it by using the {{variables.ordered_by}} placeholder.
Upon creating an Action Payload Definition record, the different properties of the JSON in the payload field will be automatically extracted and for each of them a record in the Action Payload Fields sys_declarative_action_payload_field table will be created.
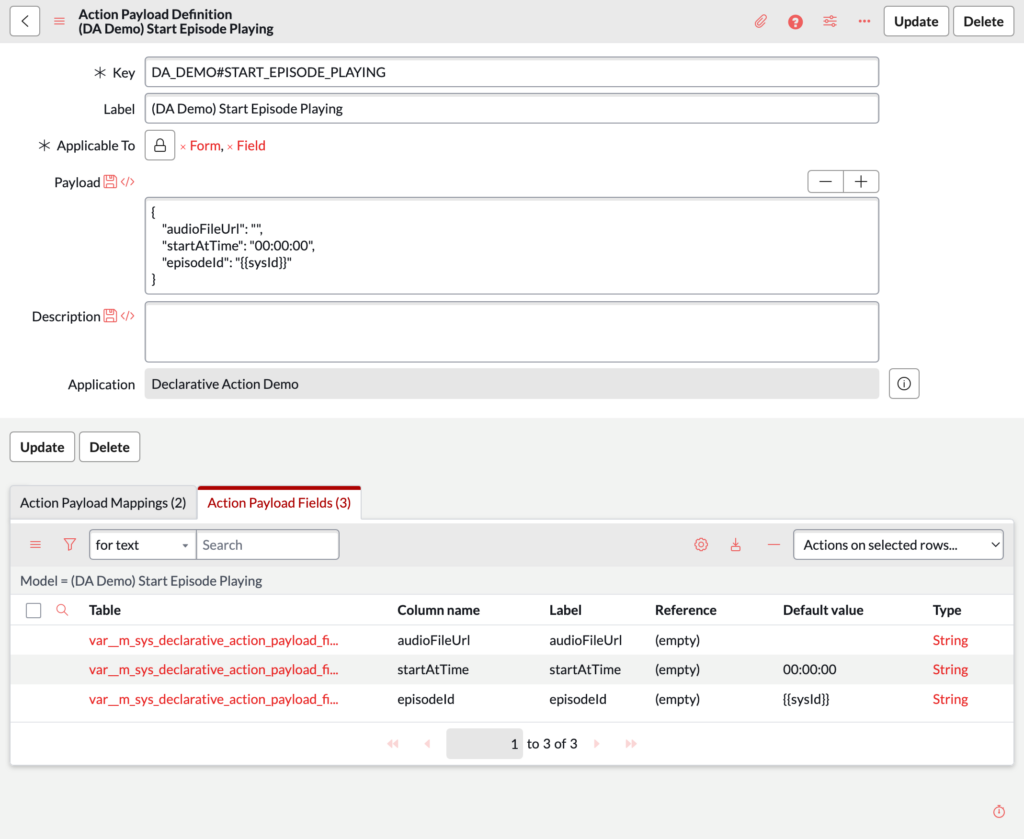
This table can mostly be ignored as it is used simply to power interfaces you’ll see later on to override the template values within the JSON template when a Declarative Action Author is actually creating a DA.
For each model the payload supports, a record in the Action Payload Mapping sys_declarative_action_payload_mapping table will also be created.
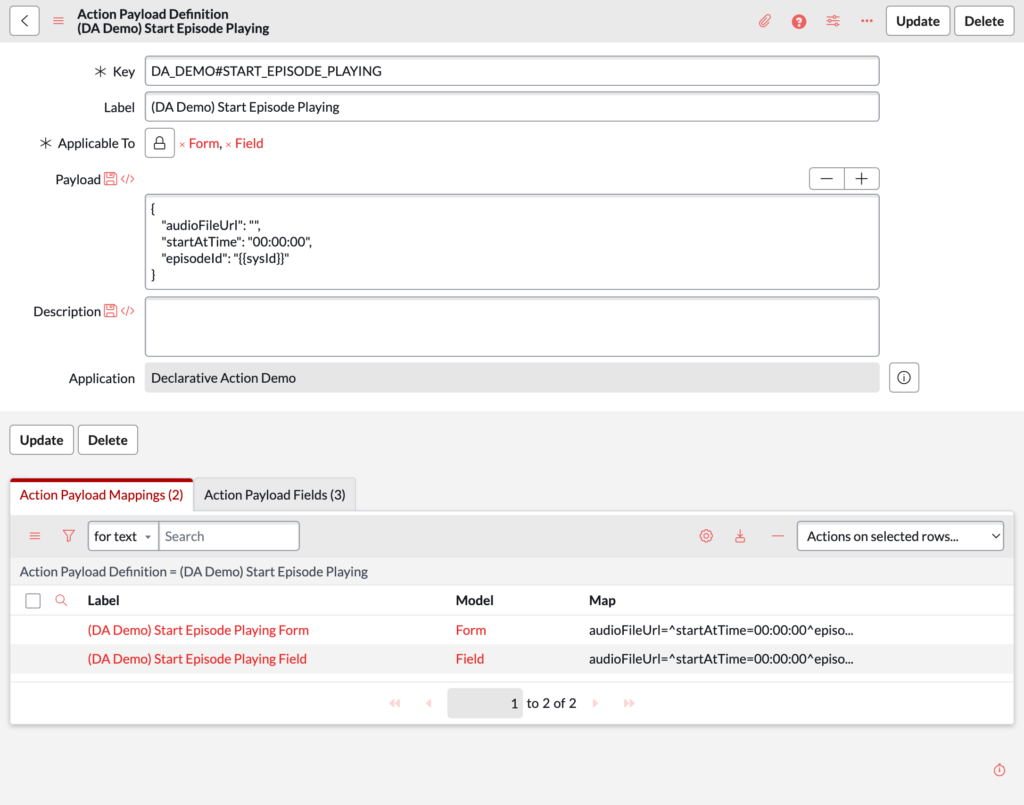
Again, this table can be ignored as it doesn’t seem to serve any purpose other than perhaps assisting with the back-end functioning of the DA configuration and runtime behaviour of which Page Authors and Declarative Action Authors do not need to be concerned with.
Creating & Assigning Declarative Actions
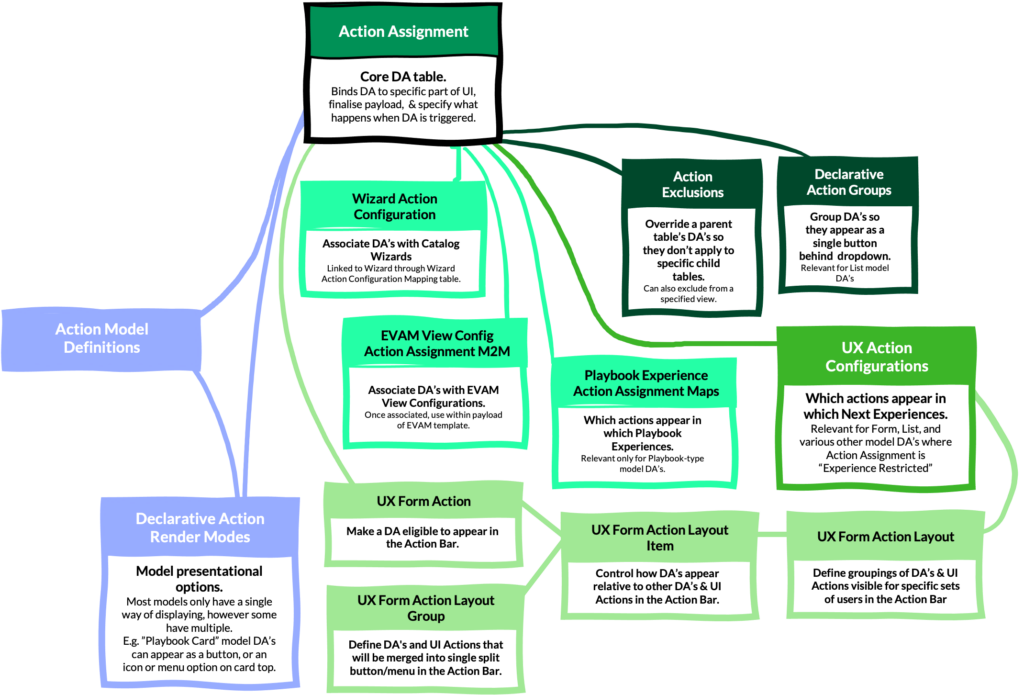
The core table at the heart of the Declarative Actions concept is the Action Assignment sys_declarative_action_assignment table. This is the place that Declarative Action Authors will create actual DA’s and set their core attributes such as:
- The model of the DA – i.e. the type of their DA e.g Form, Field, Playbook Card etc.
- The label – i.e. what text appears on the button.
- The conditions for it appearing – what types of records should it appear on, for which roles.
- How it is implemented – i.e. Client Script, Server Script, or UXF Client Action.
The table name Action Assignment being the place to create DA’s may be a little confusing, especially since there’s an Action Definitions sys_declarative_action_definition table and the term “definitions” is used elsewhere in the DA data model to be the place where you create/define things.
However, this Action Definitions table is only relevant to how DA’s appear in the legacy Agent Workspace and is not involved in any way for Next Experience-based interfaces so it is safe to ignore it and consider the Action Assignment table as being the core table for creating/defining DA’s.
For Vancouver-and-earlier releases of ServiceNow it’s important to never visit the Action Assignment table directly when creating new DA’s. This is because the Model field on the Action Assignment form (where the type of DA is set) is hidden by default and set automatically depending on the module and list you navigated to the form through.
When creating a DA you should thus navigate to the table via the relevant module in the Application Navigator for that type and then press the New button on that list. These are as follows:
| DA Type | Application Navigator Path |
|---|---|
| Catalog Wizard | Service Catalog Wizards > Catalog Wizard Declarative Actions |
| Attachment | Workspace Experience > Actions & Components > Attachment Actions |
| Field | Workspace Experience > Actions & Components > Field Decorators |
| Form | Now Experience Framework > Actions & Events > Action Bar Declarative Actions |
| List | Workspace Experience > Actions & Components > List Actions |
| Playbook | Playbook Experience > Actions > Playbook Actions |
| Playbook Stage | Playbook Experience > Actions > Stage Actions |
| Playbook Card | Playbook Experience > Actions > Activity Actions |
| Related List | Workspace Experience > Actions & Components > Related List Actions |
| EVAM | Entity Viewer Action Mapper (EVAM) > Action Definitions |
| Board | No module available. Access list directly via /sys_declarative_action_assignment_list.do?sysparm_query=model%3D45757de50fa52010ad4437a98b767e33&sysparm_view=board_action |
Depending on the type of DA and how it is implemented, there will be various additional things to configure via this record. For example, for Field-type DA’s, what types of fields or specific fields should it appear on and what icon should appear on the button? For DA’s implemented as a UXF Client Action, what is the Action Payload Definition that should be dispatched when the button is pressed?
Furthermore, in addition to the configuration options directly on the Action Assignment record there are also a number of related tables that that control how and under what scenarios a DA of certain types appear & behave.
| Table | Relevant to DA Types | Description |
|---|---|---|
UX Actions Configurationssys_ux_action_config | Form-type List-type | Which actions appear in which Next Experiences. |
Action Exclusionssys_workspace_declarative_action_exclusion | Form-type List-type | Override a parent table’s DA’s so they don’t apply to specific child tables. Can also exclude from a specified view. |
Declarative Action Groupssys_declarative_action_group | List-type | Group DA’s so they appear as a single button behind a dropdown for the List component. |
UX Form Actionsys_ux_form_action | Form-type | Make a DA eligible to appear in the Action Bar. |
UX Form Action Layout Itemsys_ux_form_action_layout_item | Form-type | Control how DA’s appear relative to other DA’s & UI Actions in the Action Bar. |
UX Form Action Layoutsys_ux_form_action_layout | Form-type | Define groupings of DA’s & UI Actions visible for specific sets of users in the Action Bar |
UX Form Action Layout Groupsys_ux_form_action_layout_group | Form-type | Define DA’s and UI Actions that will be merged into single split button/menu in the Action Bar. |
Wizard Action Configurationsc_wizard_action_config | Catalog Wizard-type | Associate DA’s with Catalog Wizards. Linked to Wizard through Wizard Action Configuration Mapping table. |
EVAM View Config Action Assignment M2Msys_ux_predicate_m2m_action_assignment | EVAM-type | Associate DA’s with EVAM View Configurations. Once associated, use within payload of EVAM template. |
Playbook Experience Action Assignment Mapssys_playbook_experience_action_assignment_map | Playbook-type Playbook Stage-type Playbook Card-type | Which actions appear in which Playbook Experiences. Relevant only for Playbook-type model DA’s. |
Declarative Action Render Modessys_declarative_action_render_mode | Playbook-type Playbook Stage-type Playbook Card-type | Model presentational options. Most models only have a single way of displaying, however some have multiple. E.g. ”Playbook Card” model DA’s can appear as a button, or an icon or menu option on card top. |
These supplementary tables only really need to be worried about if you are dealing with a DA of the relevant types listed in the table above. Each of them have their own use case related configuration, for example for the UX Form Layout-related tables these allow UI Actions and Declarative Actions to be positioned alongside each other, and control the visibility of these items for different users and groups.
Handling the Action
Now that we’ve covered what needs to be done to get a Declarative Action to display, the equally important task of course is setting what happens when the Declarative Action is triggered. As previously mentioned, the “Implemented as” field of the Action Assignment record will determine this, but let’s go into detail on how the different implementation methods work in further detail.
Client Script & Server Script
Selecting that a DA is implemented as a Client Script or Server Script will reveal the relevant script field on the form. The scripting environment here is almost exactly like the relevant UI Action type, with context supplied through current (and in some situations parent) on the server-side, and GlideList and GlideForm API’s on the client-side.

This is quite a simple concept, as triggering the Declarative Action just runs a script, and that script operates in a way that anyone used to server-side and client-side UI Actions should be familiar with.
UXF Client Action
A much more new concept though is the way that a DA that’s implemented as a UXF Client Action works.
The Action Payload Definition selected on the Action Assignment record via its Specify client action field will generate the structure of the JSON payload of the action. Let’s reuse the example from before of the action that plays an audio file:
{
    "audioFileUrl": "",
    "startAtTime": "00:00:00",
    "episodeId": "{{sysId}}",
}
The default values of that payload will be used, and any placeholders will be replaced with the contextual data of the Action Model Field with that name for the relevant Action Model Definition.
For example, if we used that Action Payload Definition for a DA appearing in an Action Bar component, it might end up like this:
{
    "audioFileUrl": "",
    "startAtTime": "00:00:00",
    "episodeId": "0a98dc8219a941d3a501ef9053b79664",
}
Notice that the {{sysId}} placeholder has been replaced by the actual sys ID of the record.
With the payload generated, it can be overridden on a per-Action Assignment basis using the Payload Map field on the Action Assignment record.
For example, we could select audioFileUrl from the dropdown, and set its value to be the URL of an MP3 file, and do the same for startAtTime and set its value to be 00:01:00.
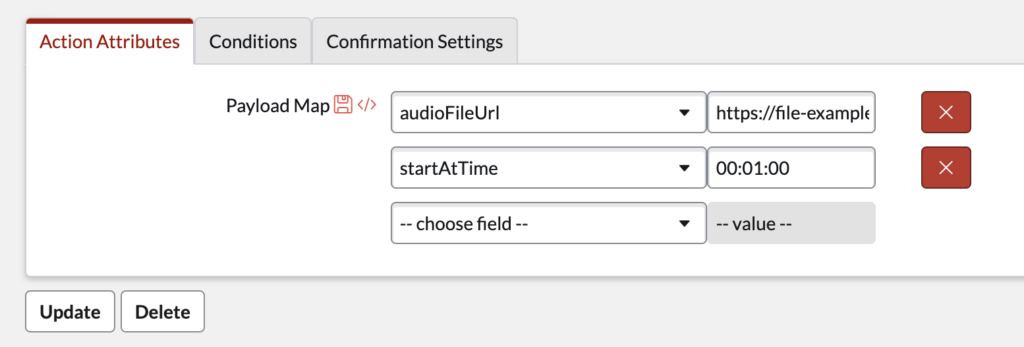
Doing so would give us a payload like this:
{
    "audioFileUrl": "https://file-examples.com/wp-content/storage/2017/11/file_example_MP3_700KB.mp3",
    "startAtTime": "00:01:00",
    "episodeId": "0a98dc8219a941d3a501ef9053b79664",
}
Notice that the episodeId property is still on the JSON. This is because the Payload Map field is overriding the values, rather than creating a whole new payload.
We also have still have access to the values from the Action Model Fields in the Payload Map here too, and we can use the same double-curly bracket notation to refer to these fields, for example: {{isNewRecord}}. Helpfully, the Action Model Fields available for that particular DA type will be shown in a related list at the bottom of the form, allowing easy reference to the contextual data available when using double-curly brackets.
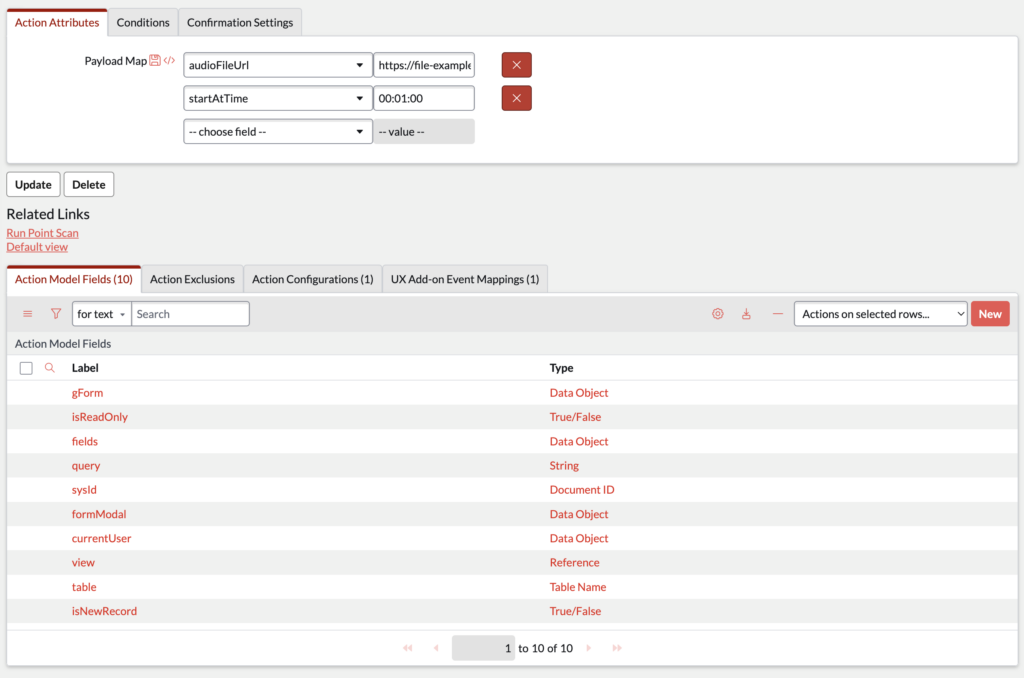
To illustrate how this payload is built you can refer to the following diagram:

Add-on Event Mappings
So where does the payload actually go? How does it influence and cause something to actually happen on a Next Experience-based interface like a specific modal dialog appearing, or a specific audio file to start playing at a specific point. That’s where the UX Add-on Event Mapping sys_ux_addon_event_mapping table comes in.
UX Add-on Event Mapping records are for a Declarative Action Author to explicitly say that for a certain instance of a component on a specific variant of a page, which of the handled events on a that page should be dispatched when a specific Declarative Action is triggered.
There are 5 fields on this table that are crucial for these records:
- Source Declarative Action – the Declarative Action being being triggered (i.e. the Action Assignment).
- Parent Macroponent – the specific variant of a page that the component is on (from the UX Macroponent Definition
sys_ux_macroponenttable). You can find the relevant UX Macroponent Definition record by opening the page variant in UI Builder and from the hamburger menu in the top-left corner of the interface choosing Developer > Open Page Definition.
- Source element ID – the ID of the instance of the component on the page variant, for example
da_demo_list.
- Target Event – the target event handler of the page. This will be a UX Event
sys_ux_eventrecord and must be listed in the Handled Events field of the page variant listed in the Parent Macroponent field.
- Target Payload Mapping – instructions for how the payload of the Declarative Action is mapped onto the properties of the handled event on the page. For example, the payload’s
episodeIdproperty might be mapped onto theidOfEpisodeToPlayproperty of the handled event being targeted.
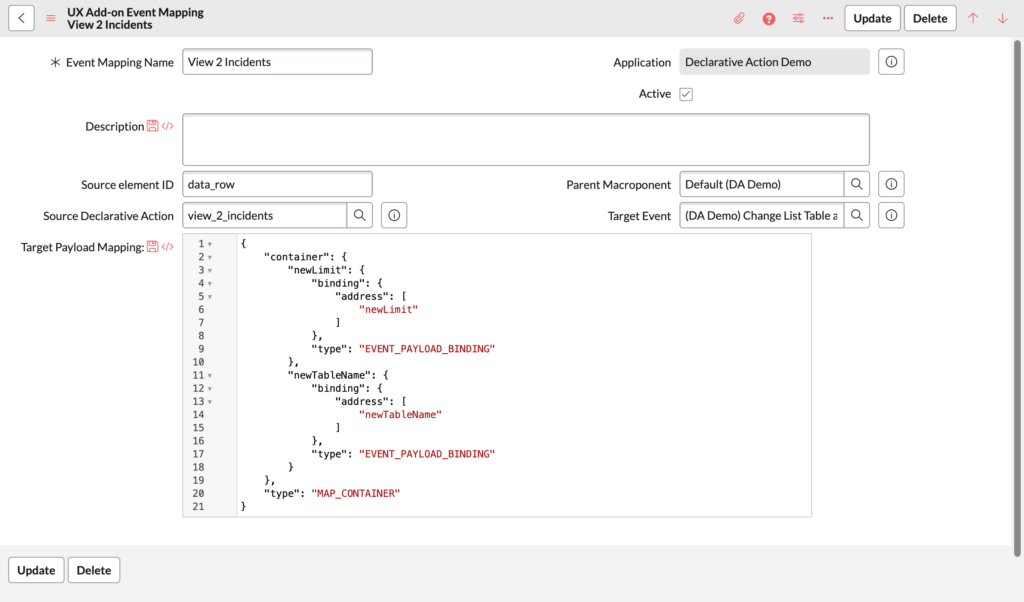
While the first 4 fields are pretty easy to understand, the Target Payload Mapping field looks a little scary, right? Thankfully, in UI Builder there’s a UI that assists with creating and modifying UX Add-on Event Mapping records.
If you open the page that you want to hook your Declarative Action up to you can select from the content panel the e.g. a List component, and then in the configuration panel on the Config tab, at the bottom you’ll see a link labelled Configure declarative action mappings.
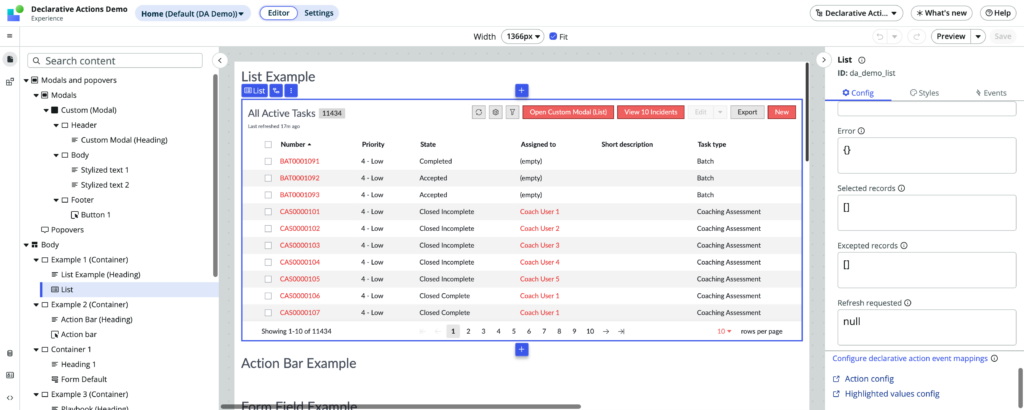
When you click it, a modal dialog will appear allowing you to create and edit UX Add-on Event Mapping records.
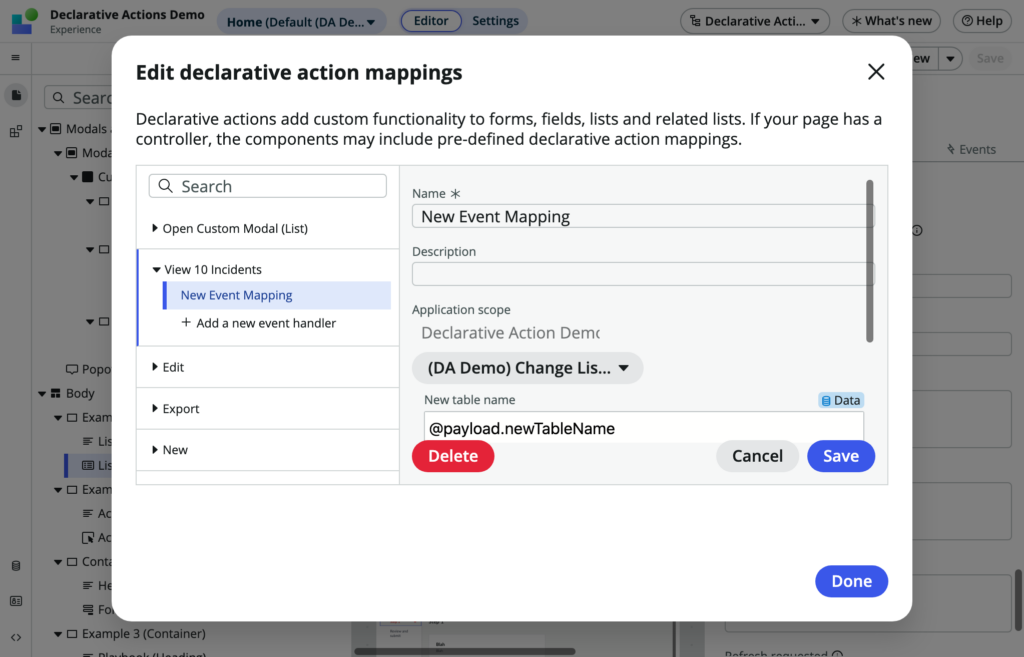
Because you’re on a specific page, and you clicked a specific component on it, that informs the values of the Parent Macroponent and Source element ID fields. The panel on the left lets you see which Declarative Actions could be dispatched by this component, and allows you to choose the relevant one to be the Source Declarative Action.
The dropdown in the middle allows you to select which handled event of the page is the Target event, and finally the fields below that allow you to use a regular UI Builder binding scheme to easily create the JSON that will be put into the Target Payload Mapping field.
For example, to map a payload’s episodeId property onto an idOfEpisodeToPlay property of a target handled event, you would see a field here called something like “ID of Episode to Play” (or whatever the label of the idOfEpisodeToPlay property is) and you would set that to @payload.episodeId – @payload in this case is referring to the payload of the Declarative Action.
Handled Events
While the Declarative Action Author is creating Declarative Actions and mapping those actions to handled events on the page, the Page Author is responsible for the page itself, what events it handles, and what happens when those handled events occur.
UX Add-on Event Mapping records can only be associated with events that are listed in the Handled Events field of the macroponent of the page variant. This can be viewed from the UX Macroponent Definition record itself:
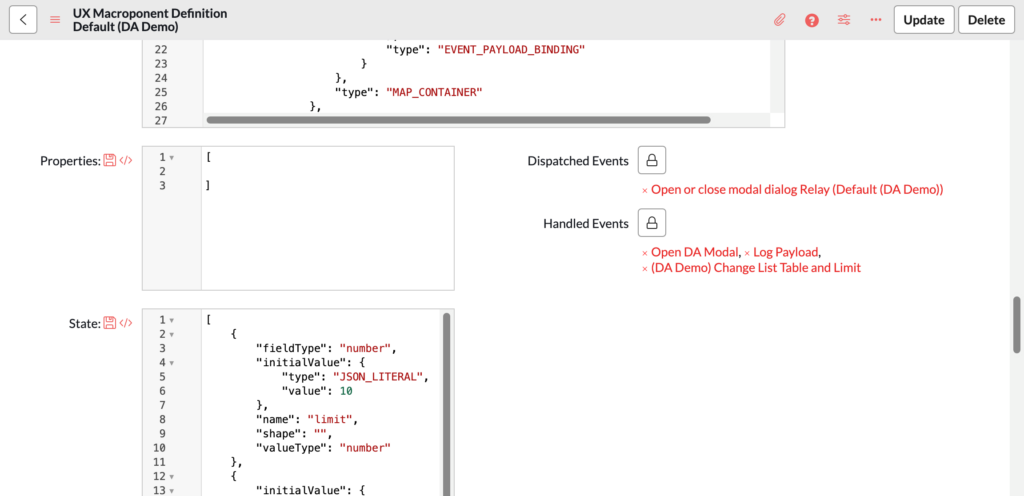
Handled events are UX Event sys_ux_event records and can be created directly in that table themselves, then manually associated with the page via this Handled Events field.
Handled events can also be viewed directly in UI Builder by selecting Body from the content panel, and in the Events tab of the configuration panel scrolling to the bottom to see the Handled events section:
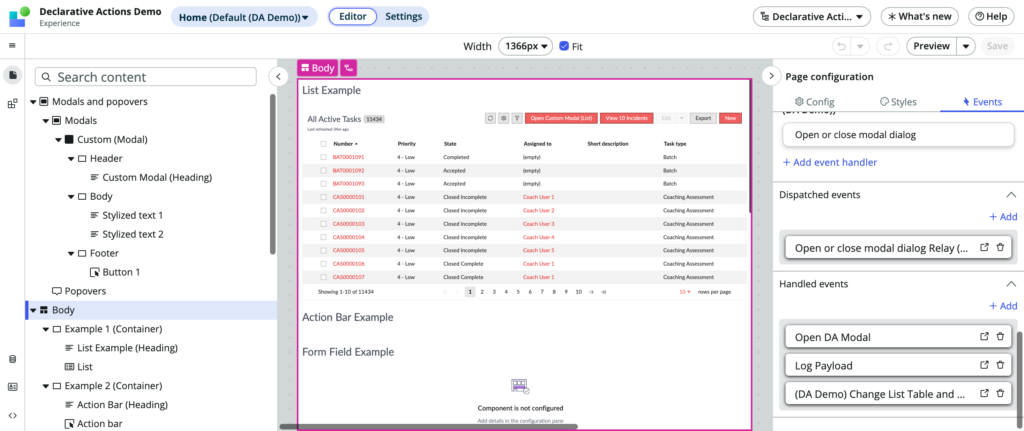
From the Handled events section you can edit existing handled events, or define new handled events.
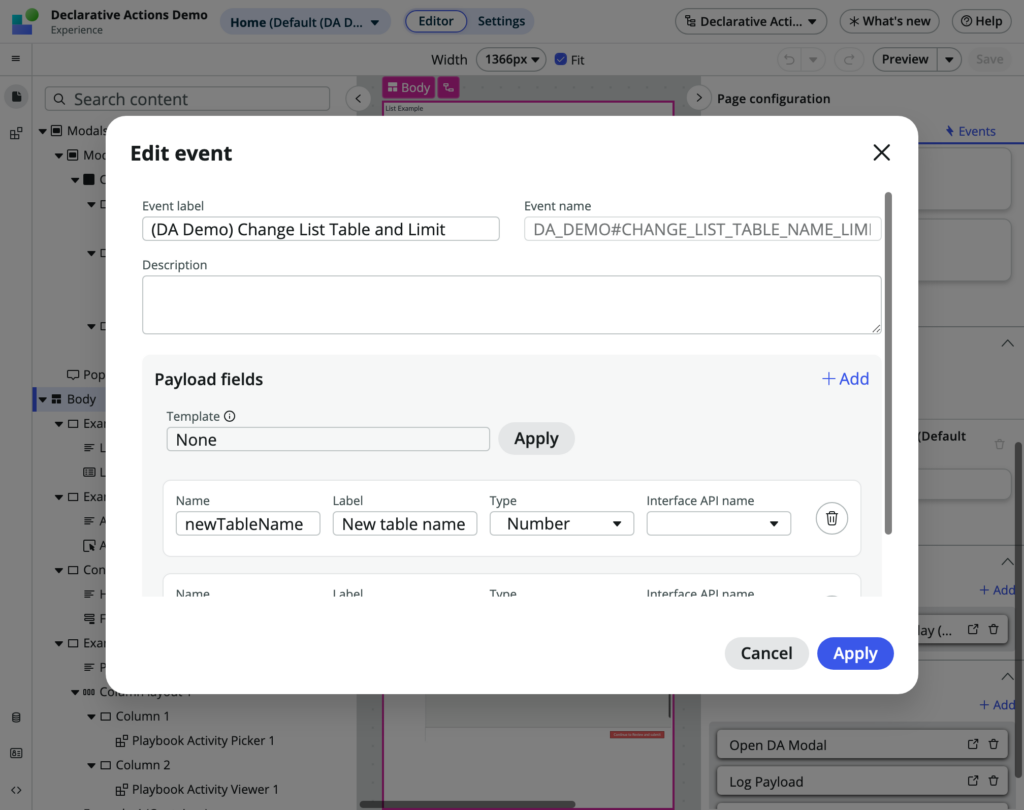
The above creates and/or associates a handled event with the page, and once that’s done the Page Author can specify what happens when those handled events occur.
Scrolling to the top of the Events tab of the configuration panel, with the handled event now associated with the page we will be able to create event mappings for it. If we click the + Add event mapping button the handled event will appear in the dropdown list.
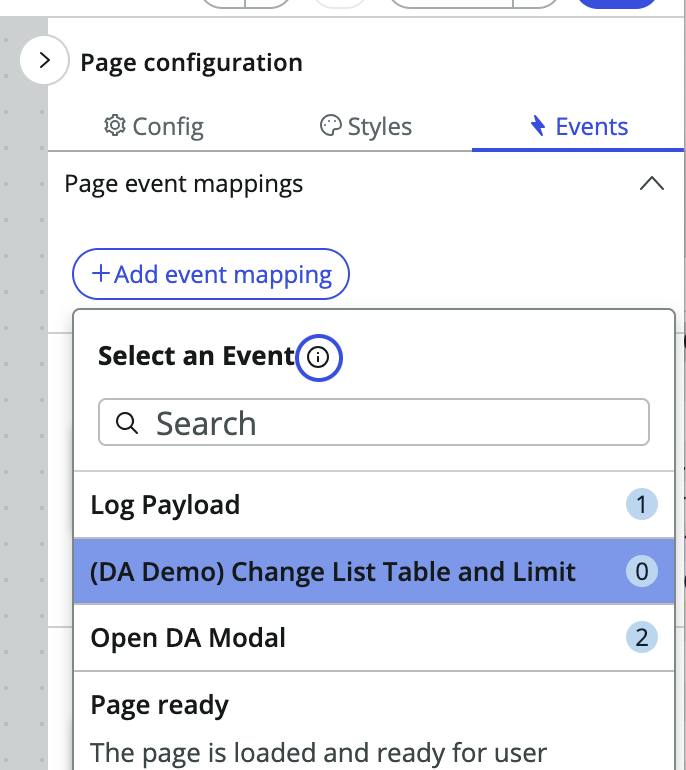
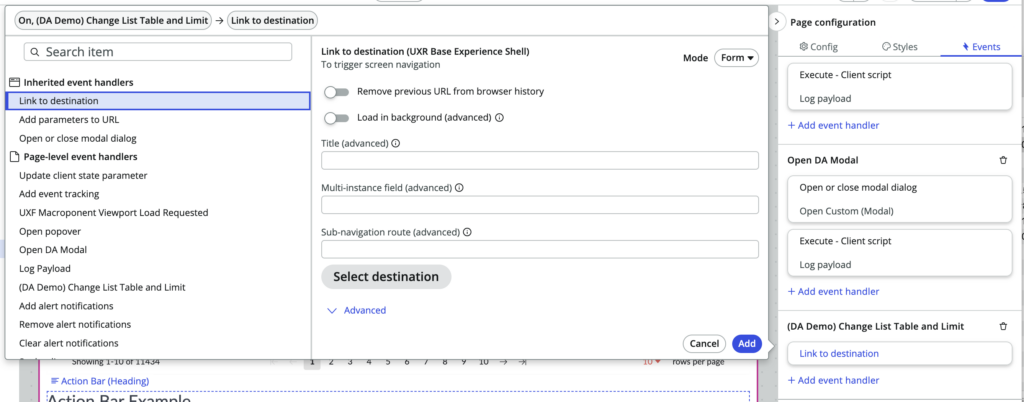
Clicking it will make that event appear in its own section, and we can click the Add event handler link to open up the event mapping dialog to do things like link to a particular destination, open a modal, perform operations on a data resource, or anything else that can be done in UI Builder via events.
To illustrate the way this is set up, please refer to the following diagram:
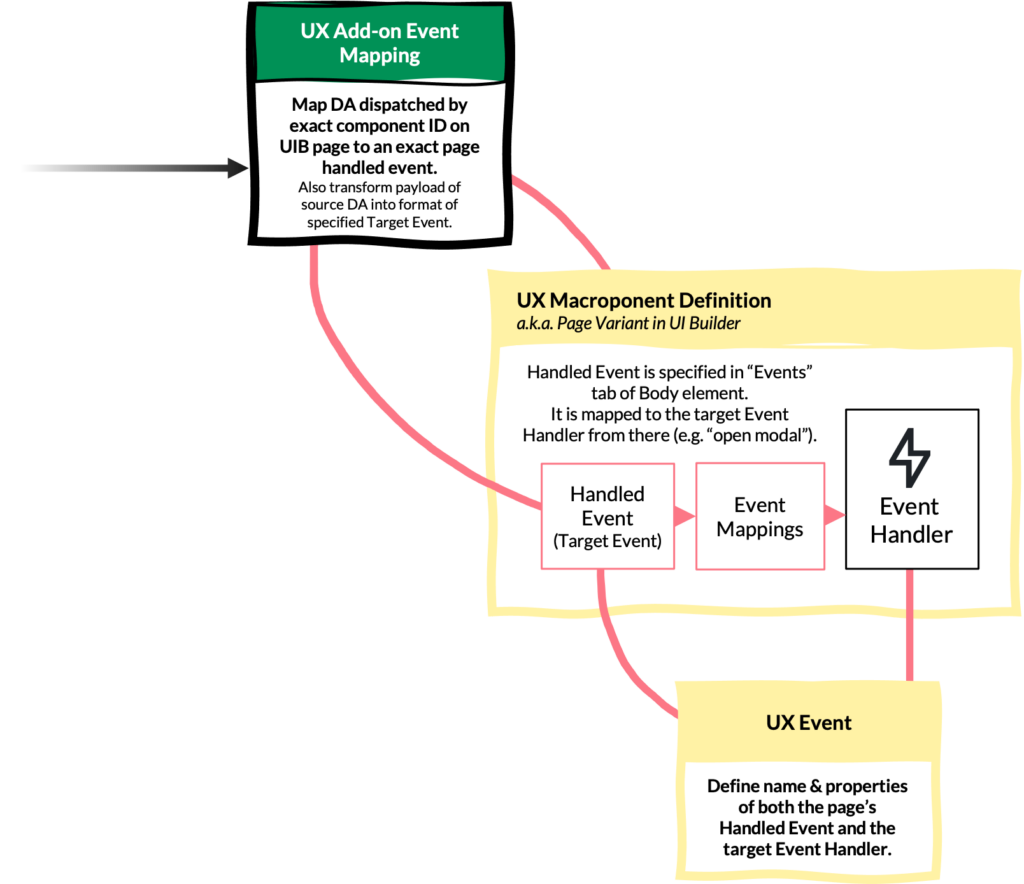
As mentioned in the section about personas, a Page Author is likely to be creating these event mappings on the page first – e.g. open a modal dialog, or start playing an audio file. Then at a later date a Declarative Action Author will come along and create their Declarative Actions, and map them to the handled events of the page.
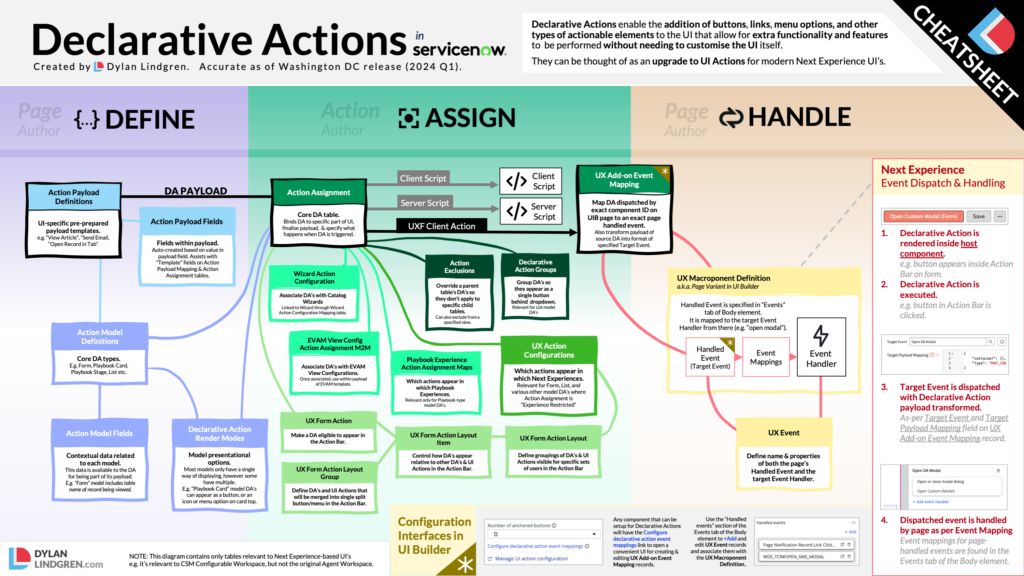
Declarative Action Cheatsheet
Instead of having to read this article every time you want a refresher on Declarative Actions in ServiceNow, I created this handy single page cheatsheet to describe what the purpose of each table is, its relationship to other tables, and the general persona responsibilities for the tables. It also covers some tips on event dispatch and handling, and the configuration interfaces available in UI Builder.
Sample Application
I’ve published a sample application to Github to show examples of what these various Declarative Actions look like when setup. You can find it on Github at dylanlindgren/declarative-actions-demo. If you fork the repo into your own Github account you will be able to import the fork of the repo into your instance using ServiceNow Studio.
Conclusion
I hope this article has helped you to understand Declarative Actions in ServiceNow.
Please leave a comment below if you have any feedback on this article, and follow me on X at x.com/dylanlindgren to keep in touch!
